Saturday, February 16, 2013

Simple ways to speed up your xp

10 Simple Ways To Speed Up Your Windows XP

 1. Defrag Disk to Speed Up Access to Data
One of the factors that slow the performance of the computer is disk fragmentation. When files are fragmented, the computer must search the hard disk when the file is opened to piece it back together. To speed up the response time, you should monthly run Disk Defragmenter, a Windows utility that defrags and consolidates fragmented files for quicker computer response.
* Follow Start > All Programs > Accessories > System Tools > Disk Defragmenter* Click the drives you want to defrag and click Analyze* Click Defragment


2. Detect and Repair Disk Errors
Over time, your hard disk develops bad sectors. Bad sectors slow down hard disk performance and sometimes make data writing difficult or even impossible. To detect and repair disk errors, Windows has a built-in tool called the Error Checking utility. It’ll search the hard disk for bad sectors and system errors and repair them for faster performance.
* Follow Start > My Computer* In My Computer right-click the hard disk you want to scan and click Properties* Click the Tools tab* Click Check Now* Select the Scan for and attempt recovery of bad sectors check box* Click Start


3. Disable Indexing Services
Indexing Services is a little application that uses a lot of CPU. By indexing and updating lists of all the files on the computer, it helps you to do a search for something faster as it scans the index list. But if you know where your files are, you can disable this system service. It won’t do any harm to you machine, whether you search often or not very often.
* Go to Start * Click Settings* Click Control Panel* Double-click Add/Remove Programs* Click the Add/Remove Window Components* Uncheck the Indexing services* 

4. Optimize Display Settings
Windows XP is a looker. But it costs you system resources that are used to display all the visual items and effects. Windows looks fine if you disable most of the settings and leave the following:
* Show shadows under menus* Show shadows under mouse pointer * Show translucent selection rectangle * Use drop shadows for icons labels on the desktop * Use visual styles on windows and buttons


5. Speedup Folder Browsing
You may have noticed that everytime you open My Computer to browse folders that there is a little delay. This is because Windows XP automatically searches for network files and printers everytime you open Windows Explorer. To fix this and to increase browsing speed, you can disable the “Automatically search for network folders and printers” option.


6. Disable Performance Counters
Windows XP has a performance monitor utility which monitors several areas of your PC’s performance. These utilities take up system resources so disabling is a good idea.
* Download and install the Extensible Performance Counter List(http://www.microsoft.com/windows2000/techinfo/reskit/tools/existing/exctrlst-o.asp)* Then select each counter in turn in the ‘Extensible performance counters’ window and clear the ‘performance counters enabled’ checkbox at the bottom button below


7. Optimize Your Pagefile
You can optimize your pagefile. Setting a fixed size to your pagefile saves the operating system from the need to resize the pagefile.
* Right click on My Computer and select Properties * Select the Advanced tab * Under Performance choose the Settings button * Select the Advanced tab again and under Virtual Memory select Change * Highlight the drive containing your page file and make the initial Size of the file the same as the Maximum Size of the file.
Windows XP sizes the page file to about 1.5X the amount of actual physical memory by default. While this is good for systems with smaller amounts of memory (under 512MB) it is unlikely that a typical XP desktop system will ever need 1.5 X 512MB or more of virtual memory. If you have less than 512MB of memory, leave the page file at its default size. If you have 512MB or more, change the ratio to 1:1 page file size to physical memory size.


8. Remove Fonts for Speed
Fonts, especially TrueType fonts, use quite a bit of system resources. For optimal performance, trim your fonts down to just those that you need to use on a daily basis and fonts that applications may require.
* Open Control Panel * Open Fonts folder * Move fonts you don’t need to a temporary directory (e.g. C:FONTBKUP?) just in case you need or want to bring a few of them back. The more fonts you uninstall, the more system resources you will gain.


9. Use a Flash Memory to Boost Performance
To improve performance, you need to install additional RAM memory. It’ll let you boot your OS much quicker and run many applications and access data quicker. There is no easiest and more technically elegant way to do it than use eBoostr (http://www.eboostr.com).
eBoostr is a little program that lets you improve a performance of any computer, powered by Windows XP in much the same way as Vista’s ReadyBoost. With eBoostr, if you have a flash drive, such as a USB flash thumb drive or an SD card, you can use it to make your computer run better. Simply plug in a flash drive through a USB socket and Windows XP will use eBoostr to utilize the flash memory to improve performance.
The product shows the best results for frequently used applications and data, which becomes a great feature for people who are using office programs, graphics applications or developer tools. It’ll surely attract a special attention of laptop owners as laptop upgrade is usually more complicated and laptop hard drives are by definition slower than those of desktops.


10. Perform a Boot Defragment
There's a simple way to speed up XP startup: make your system do a boot defragment, which will put all the boot files next to one another on your hard disk. When boot files are in close proximity to one another, your system will start faster.
On most systems, boot defragment should be enabled by default, but it might not be on yours, or it might have been changed inadvertently. To make sure that boot defragment is enabled:
* Run the Registry Editor* Go to HKEY_LOCAL_MACHINESOFTWAREMicrosoftDfrgBootOptimizeFunction* Set the Enable string value to Y if it is not already set to Y.* Exit the Registry* Reboot
Hope you find these 10 tips useful. Have a nice day!

 Fix Windows Errors & Optimize Your System 

                             Click Here


Tuesday, February 12, 2013

Spectacular scratch

finally finished


Spectacular scratch-built project is finally finished 
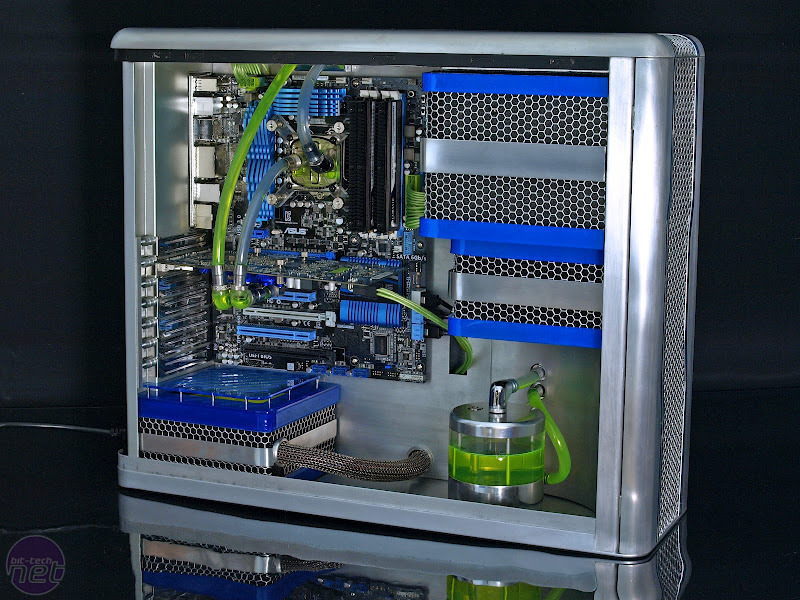
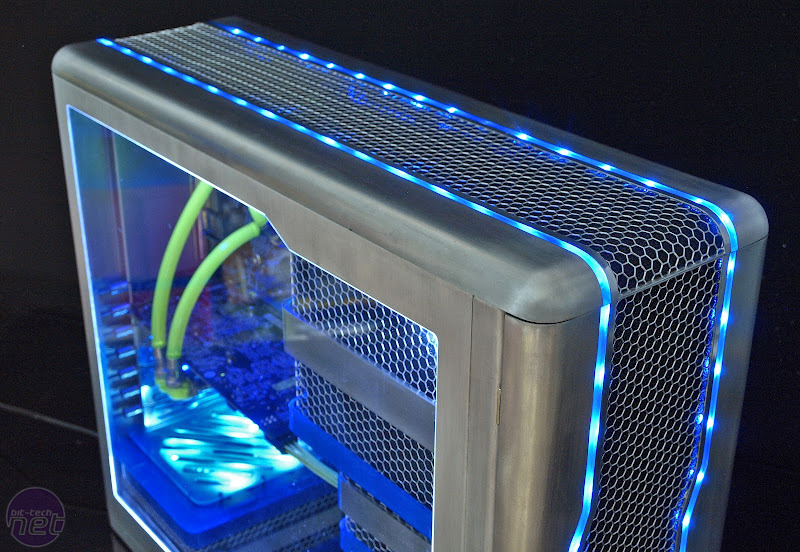
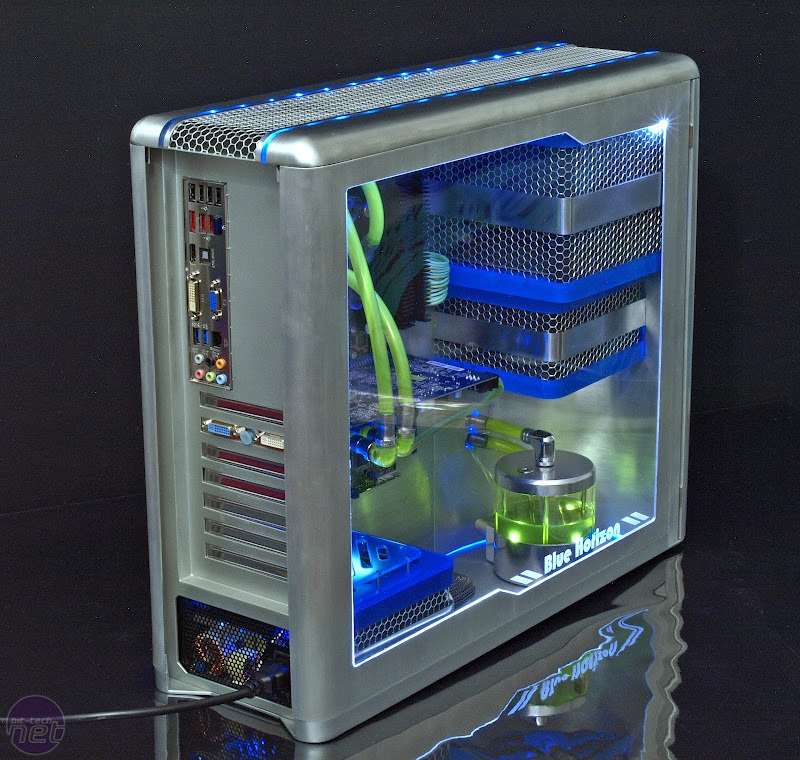
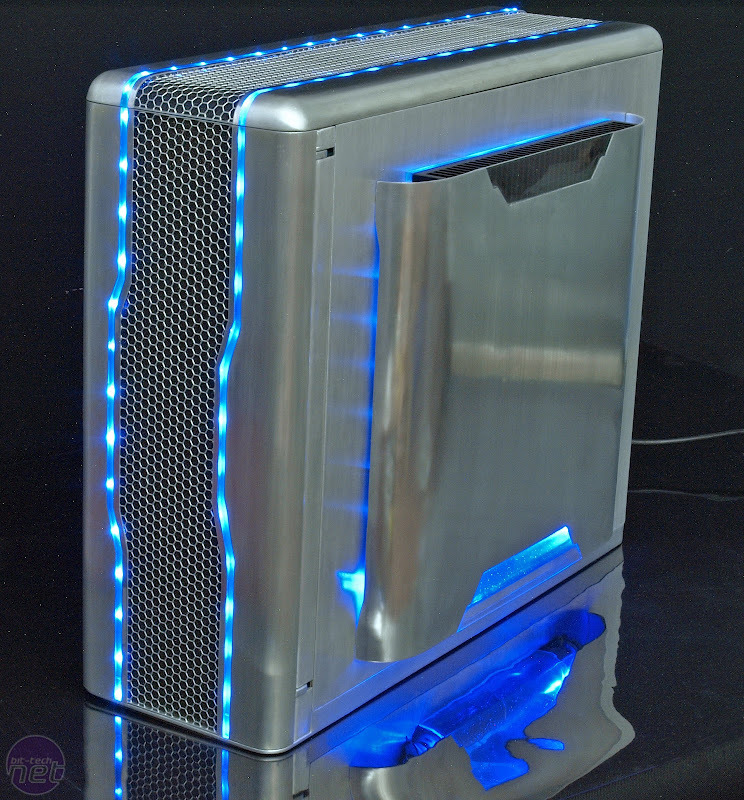
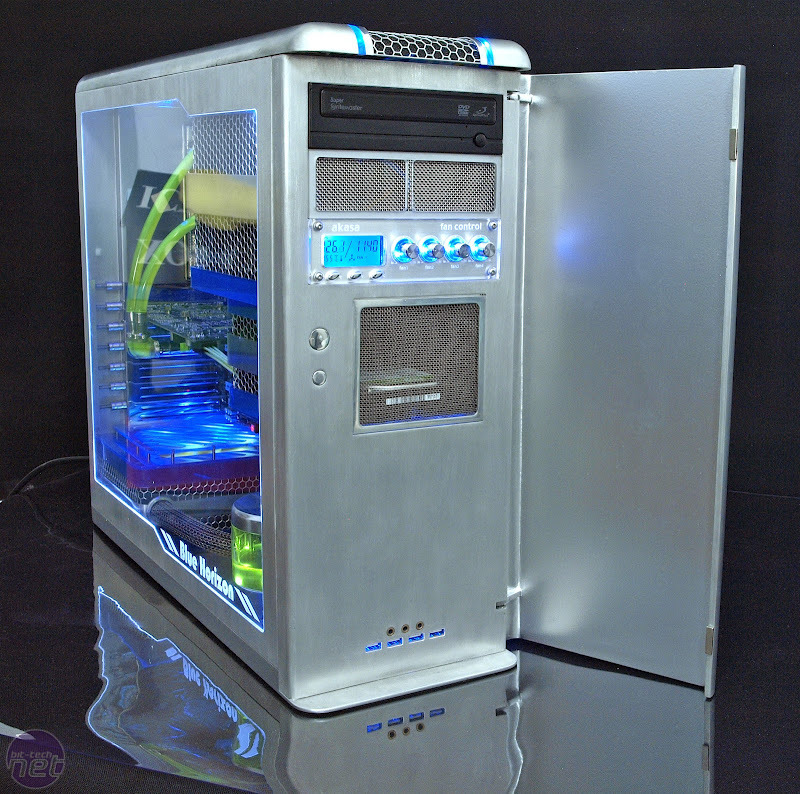
 Blue Horizon began in 2010 and the work that was involved is quite simply staggering
It started in 2010 with some interesting renders of a tower case and large side-mounted radiator that followed forum member riekmaharg2's previous project, Silent Fiberglass.

However, even the incredibly technical-looking exploded diagrams we saw early on couldn't have prepared us for what lay in store over the next 20 months. Blue Horizon is so detailed and so intricate that it's literally only in the last few months that we've begun to see just how awesome it would be.

We lost count of how many updates riekmaharg2 posted, but the project's 71-page marathon is choc-full of eyecandy. It's a water-cooled masterpiece that we're simply proud to have on our forum. As many of our forum members have already said - riekmaharg2 should be very proud of what he has achieved.

This looks like the project to beat in 2012. But enough of our drivel, here's some eye candy and of course, make sure you check out riekmaharg2's project log to see how Blue Horizon was made.

Spectacular scratch-built project is finally finished *Spectacular scratch-built project is finally finished Spectacular scratch-built project is finally finished *Spectacular scratch-built project is finally finished
Click to enlarge

Spectacular scratch-built project is finally finished *Spectacular scratch-built project is finally finished Spectacular scratch-built project is finally finished *Spectacular scratch-built project is finally finished
Click to enlarge

Spectacular scratch-built project is finally finished *Spectacular scratch-built project is finally finished Spectacular scratch-built project is finally finished *Spectacular scratch-built project is finally finished
Click to enlarge

Spectacular scratch-built project is finally finished *Spectacular scratch-built project is finally finished

Monday, February 11, 2013

Top 10 tools for pc case mod

Top 10 tools

In the last year or so I’ve been working on case mods and even my first scratch-built case too. I’ve been dealing with metals, acrylic and all manner of adhesives and of course many different tools to get the jobs I needed done. I actually thought I had most of the tools required, and the knowledge too, but as it turns out, I needed to do plenty more research and acquire several new tools, particularly when it came to building my own case.

While we love modding on a budget, doing things properly does require certain tools. Below is our list that makes up an awesome modder’s toolbox.

Our modder's toolset

  • Cable braiding kit
  • Dremel
  • Drill
  • Finger files
  • Heat gun
  • Jigsaw
  • Mini blow torch
  • Rivet gun
If you’re thinking about getting into modding, or even making the move from case modding to scratchbuilding, here are some of my favourites and most useful tools that I’ve found invaluable, or desire to own.

Mini blow torch

This is probably the most unlikely tool I thought I’d own but it’s come in handy for so many things. My scratchbuild is made almost entirely using acrylic, and this can look quite messy once it’s been cut. I saw on bit-tech’s forum a while back that the key to obtaining clean polished edges again is all to do with what’s called flame polishing. Making sure the edges are flat first, you essentially melt the acrylic by quickly working the blow torch over the surface. Unfortunately, some of the acrylic I’d used didn’t take to well to this method, but the rest resulted in an almost religious experience, watching the rough, matte surface vanish and become a clean glossy edge.

*Top 10 PC modders tools Top ten PC Modders Tools

The blow torch can also be used for heating and bending small sections of acrylic if you don’t have a heat gun, but is also great for dealing with heat shrink wrapping on a low setting. The heat is more intense and can be applied more accurately than a lighter and you stand less of a chance of burning your fingers too.

Heat gun

*Top 10 PC modders tools Top ten PC Modders Tools


For acrylic lovers out there, a heat gun opens up a whole new world of possibilities. You’re able to heat acrylic up and bend it to pretty much any shape you like, and they cost a fraction of the asking price of a dedicated acrylic bender. As most sheet plastics return to their original shape once heated again, a heat gun is a tool you can practice with while not chewing through mounds of expensive materials. If the bend isn’t quite right, just heat it up and try again.

Dremel

*Top 10 PC modders tools Top ten PC Modders Tools


It’s difficult to talk about Dremel’s rotary tool (often referred to now as just a Dremel) without going all mushy. Yes, they haven’t lasted well in the past, but recent models are far more enduring. With that out of the way, you simply can’t match this jack of all trades when it comes to flexibility. Some have made entire cases using just a Dremel and a select few attachments.

Our favourite attachments are the cutting disc (invaluable for cutting short to medium lengths of thin material), engraving and routing tips (great for engraving and cutting inset sections in soft materials), along with grinding and sanding tips (awesome at sanding down the edges of newly-cut metal and plastics).


*Top 10 PC modders tools Top ten PC Modders Tools


Finger files are an essential tool for any modder, whatever material you’re working on. From creating USB port slots to reaching into areas a Dremel can’t, they’re a cheap and invaluable addition to your toolbox. Metal files cost a bit more but can still be useful if you’re going a little more hardcore.

Drill

*Top 10 PC modders tools Top ten PC Modders Tools


A quintessential tool for every modder out there. Whether you’re cutting a fan blow hole, toggle switch hole, screw hole or water-cooling fitting pass-through, or drilling out rivets, a drill is something every modder should own. We’ve recently made the switch from cordless to corded when our battery ran out for the last time – but whichever you choose, they’re a relatively inexpensive addition to your inventory.

Cable braiding kit

*Top 10 PC modders tools Top ten PC Modders Tools

While you can get away with using staples to remove some PSU cables, a proper kit usually makes the job a lot easier. There are numerous tools available now, from the usual Sunbeam/Phobya standard kits, to new dedicated tools although the latter can be a bit pricy. If you’re going to be braiding your PSU in the near future, you’ll certainly be wanting one of these.

Scrollsaw and Bandsaw

*Top 10 PC modders tools Top ten PC Modders Tools


The more expensive items in a modder’s shed usually include these lust-worthy tools. A scrollsaw is used for cutting out large sections in sheet materials, specifically dealing with smaller details such as curves. They have the advantage that the blades can be inserted into a pre-drilled hole, allowing you to cut out sections in the middle of your material and at angles too using guide rails.

A bandsaw on the other hand is essentially a scrollsaw on steroids. They’re able to deal with longer sections of material but can cope with curves and bends too. If you have metres of acrylic you need cut to shape and don’t want to spend weeks sanding and trimming it to shape having used a Dremel or Jigsaw, a bandsaw will make your life a heck of a lot easier, although your wallet probably won’t thank you for it.

Jigsaw

*Top 10 PC modders tools Top ten PC Modders Tools


While it’s not the most elegant of instruments, the jigsaw is a relatively cheap way of doing some of the classic modding manoeuvres. Side panel windows, fan blow holes and generally dealing with long lengths of materials too cumbersome for a Dremel – they’re all task for the jigsaw. It’s not as flexible as the Dremel, but seeing as you can pick one up for less than £20, it’s a cheaper alternative to a scrollsaw or bandsaw and a better option than a Dremel for cutting long lengths of material, particularly metal.

Rivet Gun

*Top 10 PC modders tools Top ten PC Modders Tools


I was amazed at just how cheap rivet guns are. I bought my own a few months ago for around £5 to re-rivet a case I’d dismantled prior to painting it. I’d always thought this was a tricky business but nothing could be further from the truth. The satisfying squeeze and snap and the rivet is squeezed into place and the tail removed. It's the very essence of feeling like you’re achieving something. I’d also definitely consider using it in future scratchbuilds instead of adhesives or mounts, although it will take a while to rid me of my obsession with 3M mounting tape.

Holesaw

*Top 10 PC modders tools Top ten PC Modders Tools


You can’t use a holesaw without a drill, but nonetheless, they’re fairly cheap and one of the best ways to cutting neat holes in your case. They’re available in a range of sizes, from toggle switch size all the way up to 140mm fan blowhole size. We’ve even cut through steel cases so there’s really nothing these saws can’t achieve. Just make sure you have plenty of spare batteries for your cordless drill as cutting through steel can take a while.